> For the complete documentation index, see [llms.txt](https://docs.mogoplus.ai/llms.txt). Markdown versions of documentation pages are available by appending `.md` to page URLs; this page is available as [Markdown](https://docs.mogoplus.ai/getting-started/quickstart.md).
# Quickstart
Help you get started
This guide provides a step-by-step walkthrough of the **MOGOPLUS Free Trial** application, covering the process from account creation through to downloading the completed **Income Insights** report
## Overview
MOGOPLUS turns bank statements, payslips, or transaction CSVs into lender‑grade income insight reports. GoLend report is generated automatically based on the documents supplied:
| Report type | Triggered by |
| ------------------------------------ | ---------------------------- |
| **GoLend** (income & expense report) | Bank statement or CSV upload |
| **Payslip report** | Payslip upload |
## Step 1 - Create your account
1. Go to the MOGOPLUS Free Trial [sign‑up](https://insights.dev.mogoplus.ai/) screen.
2. Fill in:
* First name / Last name
* Work email
* Password (8+ characters)
3. Click **Create free account**
No credit card is required. You'll land straight on your dashboard.
{% hint style="warning" %}
Please note that after completing the sign-up process, you will receive a verification email at the registered email address. You must verify your email address using the link provided in the email before you can log in and access the application.
{% endhint %}
## Step 2 - Choose a data source
On the dashboard, decide how you want to feed data into a report:
* **Use example data** — instantly loads 3 pre‑built sample reports (one of each application outcome) so you can explore the full dashboard with no setup.
* **Upload your own** — upload a transactions file(CSV) or a real bank statement (CSV/PDF) or a payslip. This is the path to generate a report for an actual applicant.
Click the option that matches your goal, then use the **How it works** panel's call‑to‑action button to proceed (e.g. **Start uploading**).
## Step 3 - Start a new application
### 3.1 Applicant details
Enter:
* First name
* Last name
* Other information such as Email address, Loan purpose, Loan amount & Employer name are optional
Click **Continue to documents**.
### 3.2 Upload documents
Choose a document type, then upload the file:
| Document type | Accepted formats |
| ---------------- | ---------------- |
| Bank statement | PDF |
| Payslip | PDF, JPG, PNG |
| Transactions CSV | CSV |
Drag and drop the file onto the upload area, or click to browse. After uploading a file, Click **Review application**.
### 3.3 Review & submit
Confirm the applicant details and the list of uploaded documents.
Click **Submit application** to begin processing.
## Step 4 - Wait for processing
The application enters an automated processing pipeline. This typically takes 15–30 seconds. When complete, click **View income report.**
## Step 5 - View the report
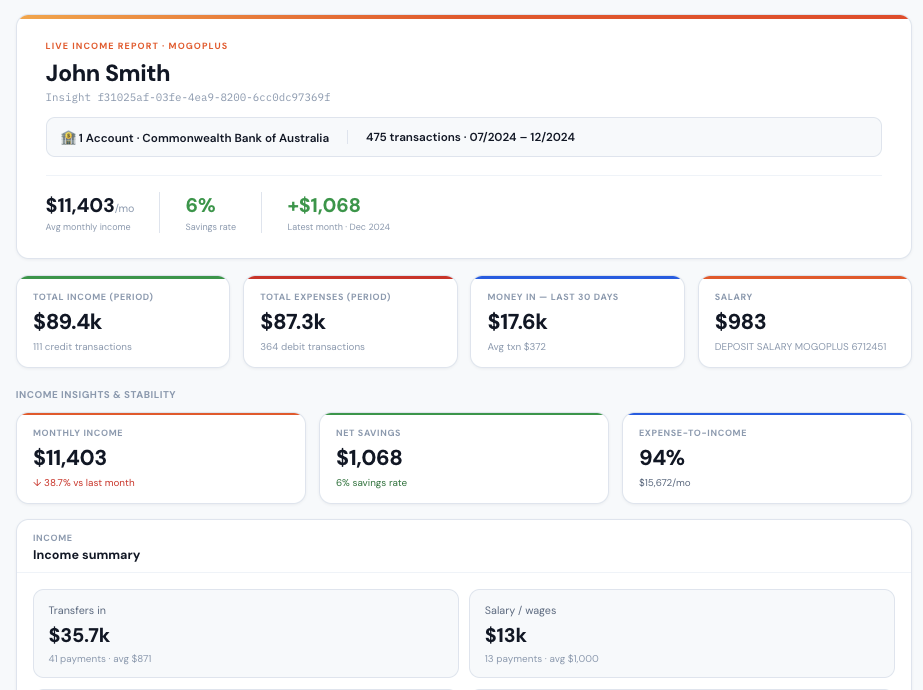
The report opens with a panel showing the applicant's name, reference number, linked bank account, transaction count, and date range.
Alternatively, as mentioned in **Step 2**, you can also access three pre-built sample reports to get a quick overview of the **GoLend report**.
---
# Agent Instructions
This documentation is published with GitBook. GitBook is the documentation platform designed so that both humans and AI agents can read, navigate, and reason over technical content effectively. Learn more at gitbook.com.
## Querying This Documentation
If you need additional information that is not directly available in this page, you can query the documentation dynamically by asking a question.
Perform an HTTP GET request on the current page URL with the `ask` query parameter, and the optional `goal` query parameter:
```
GET https://docs.mogoplus.ai/getting-started/quickstart.md?ask=&goal=
```
`ask` is the immediate question: it should be specific, self-contained, and written in natural language.
`goal` is optional and describes the broader end goal you are ultimately trying to accomplish on behalf of the user. GitBook uses it to tailor the answer towards what is most useful for that goal.
The response will contain a direct answer to the question and relevant excerpts and sources from the documentation.
Use this mechanism when the answer is not explicitly present in the current page, you need clarification or additional context, or you want to retrieve related documentation sections.